Wednesday, March 7, 2012

It's Tutorial Time - Birds On A Wire Canvas

Our lovely design team gal - Cassie McCumstie has been busying herself with some mixed media and punches in readiness for our Paper, Punches and Photos Workshop on 18 March 2012.

To 'wet the creative appetite' we have decided to publish this fabulous tutorial so you to can have a play with some mixed media backgrounds and some innovative ways of using your punches....


Materials we suggest for use are:
  • Artist canvas - any size you like (We used a 10" x 8")
  • Paint  - shades of blue and white
  • Mod Podge adhesive
  • Paint brushes
  • Paper doilies
  • Dressmaker's pattern tissue paper
  • Masking Tape
  • Black & White Cardstock
  • Black Stazon Ink Pad
  • Black Marking Pen
  • Book paper
  • Selection of background Stamps
  • Punchinello and other masks from your stash
  • Punches as outlined in the instructions below
Step 1:
To create the background. Paint with a light blue paint covering side of the canvas. Layer dress making paper, book paper, masking tape and doilies on the bottom half of the canvas to create a hilly mountain effect.


Step 2:
Draw clouds on book paper and attach to the sky.

Step 3:
Add texture with paint and stencils, i.e. Punchinello, crafters workshop etc.
** Handy Hint:  Using a 'stiple brush' the type you use for 'stenciling' works great with these tools.
Step 4:The punches used on this canvas are:
  • Martha Stewart's 'Bird on a Wire'
    ** Handy Hint:  We used black cardstock and trimmed some of the birds off to create the gaps for the bigger birds to sit.
  • StampinUp - Two Step Bird Punch
  • StampinUp - Heart Punch


Step 5:
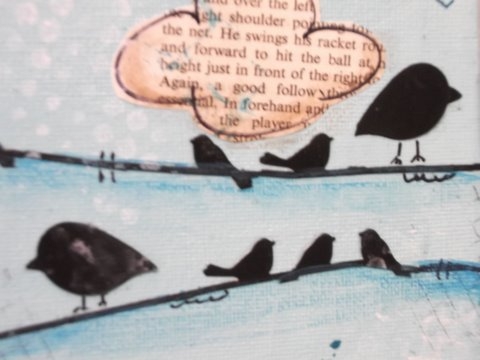
To make the bigger birds we have used the StampinUp Two Step Bird punch.  Punch two wings in black to make the bird. The pointy edge layered under the other wing makes the bird’s beak. You may need to trim some off if it’s showing. You then finish off by drawing the legs on with a black marker and add a bit of 'doodling'.


Step 6:
You are now going to punch out the leaves in black cardstock using the same punch as above to make the foliage of your tree.  Hand draw and cut a tree trunk to suit your size canvas and keep the picture in proportion.  Randomly layer the leaf motif to create the foliage as shown in the picture.


Step 7:
Punch the full heart using the StampinUp Punch or any heart punch from book paper and layer on the background to the bottom right corner.  Finish this off with a black outline.


Step 8:
Stamp a quote onto white cardstock and cut up and layer on the centre of the canvas. This quote is one from the Tim Holtz Stamp Collection called:  Good Thoughts.


Step 9:
Stamp with black Stazon Ink and white paint to build the background, creating depth by adding light and shade. It dosen’t really matter what stamps you use. You don’t really see a lot of it. We  have used a Kaiser grid, a Prima script and a Unity butterfly.  We have also used a Unity spotty background stamp with white paint as well ( you can see this in the photo below  toward the top right near the cloud).


Step 10:
Now it's time to finish off with some 'doodling'. Doodle to your liking with a permanent black marker.  We have used a StampinUp Stampin Write Marker. These are great because they will write over the Mod Podge.

Have fun playing with your punches and remember there is so much you can do beyond their untended purpose so get creative and start playing.


Xo Cassie

Somewhere Over the Rainbow - More 'Sneakies' for our March Workshop

Our lovely design team member Natalie Bright has been very busy getting lots done for our Paper, Punches and Photos Workshop on 18 March 2012.


We were very excited when Natalie handed over a gorgeous layout she had prepared for the workshop and stunned (in a good way) at what she has done to produce the embellies for this page.  

Nat has really been 'thinking outside the square' and we are sure you will be as equally 'stunned' with this great technique she is going to introduce to you at the workshop in March.


Nat's fabulous layout will have everyone talking about not only her unconventional use of a standard punch to add dimension and texture to the page, but her fun way of using  the 'left overs' to get the 'best bang' for your scrapping $$$s!!! No wonder she is one of our design team - just love a girl who uses her scraps and repurposes!!!


We have made sure that we have lots of great ideas in our Workshop room to get you thinking about those punches in so many different ways - we have had such fun with this workshop prep that we can't wait to show you all the different things you can do.

For now we wanted to just make sure we had included a few more 'sneakies' of some of the great work Nat has prepared for the day... just a little more to 'wet your creative appetite'...


Now remember we have a couple of extra spots that have opened up because we have taken to plunge and extended our maximum numbers... we also have a few of our beautiful workshop lovelies 'tripping' around overseas in the month of March so they are only ordering our kits and have left a few chairs that need warming until they return.

So if you think you would like to join us - check out the full details regarding our Workshops by clicking on the Workshop Tab above and emailing us at:  Embellees@bigpond.com to register.

The Embellees Workshops are always about technique, repurposing and introducing fun products to play with.  A great day for $60 and that includes your kit and enough projects to keep you at scrapping at a 'cracking pace' all day.


We will be back very soon with a great tutorial our lovely design team member - Cassie McCumstie has been dreaming up for us.... 'we see clouds and trees and birds all on a canvas in our very near future' - so get ready to be inspired with yet more punch ideas.

Lizzie, Lisa and the design team gals!!

Sunday, March 4, 2012

Punches the tool of choice - some Sneaky Peeks for our March Workshop


This past weekend had the Embellees Creative Team in lock-down at a lovely little holiday house working on 'secret Embellees business' and, well let's be honest lots of great food, laughs and most of all friendship was really what our weekend was all about.

We had a very big 'agenda' to work through including finishing touches to our March and May Workshops and, our first 'Tweenies Scrapbooking' Party in April .... beautiful creations were all around the table and lots of ideas had our heads spinning. 


We got busy with many a canvas, numerous layouts and playing with lots of new products and experimenting with a range of techniques.

We can't wait to share our creations with you, not to mention the new workshops we have planned.  We are going to be introducing our Tweenies Scrapbooking Workshops/Parties, Master Classes, Market Stall and our Sewing Circle... so many new and exciting opportunities!

For now it is all about our next Workshop
Paper, Punches and Photos. 


We just love using punches in our projects and most of us have been buying these since we started 'scrapping'.  We have so many in our 'stash' that we decided to 'challenge' ourselves to explore different ways to use them.

We want to revisit how great these tools can be and what fabulous interest they can add to a page as a background, an embellishment or even as a great way to create a decor item for your home. We aim to have you racing back to your stash of punches and using them all over again! If like us you have always used them, our aim is get you looking at them with fresh eyes to add new dimension to your projects.


At this Workshop you will have the opportunity to work on 4 different layouts and we are sure you will inspired by many other projects we have been developing using our punch stash.  Now you know or will have heard that a layout with the Embellees Team is not just about sticking down paper - we look forward to introducing you to some new techniques and well what can we say - it wouldn't be an Embellees Workshop without some great repurposing techniques included - yes girls we have been back to 'Bunnings' again!!!

We have opened a few extra spots on our Workshop as we have been able to expand our numbers at our venue - so if you are interested please contact us at:  Embellees@bigpond.com


We will have some more 'sneakies' to share with you in the lead up to the 18 March Workshop - so please pop back to visit us soon!

Lizzie and Lisa